Early-Access Intel Hardware Setup
 by Kevin Cloutier, April 21, 2026
Working with prerelease Intel hardware means dealing with unfinished firmware, evolving drivers, and rapidly shifting toolchains, but once everything is configured, these platforms become powerful testbeds for modern AI and robotics. This guide walks through the full bring-up process: initial provisioning, OS setup, kernel tuning, GPU/NPU runtime installation, and the workflow needed to run multimodal models, robotics frameworks, and low-latency control loops on Intel's next-generation compute stack.
For this guide, the target platform is a pre-release AAEON UP Xtreme PTL Edge, an engineering-sample board built around Intel's Panther Lake architecture. It's a compact edge system with serious headroom for robotics and AI work, combining the new Xe3 Intel® Arc™ GPU with the Intel NPU 5.0 for up to 180 TOPS of combined acceleration. The board is designed for vision-driven, latency-sensitive workloads and industrial environments, which makes it a good match for the kind of multimodal inference, perception pipelines, and real-time control loops we run in robotics research. Because this unit is an early evaluation sample, expect a few rough edges and shifting components in the software stack, part of the reason this guide exists is to document how to get everything stable and usable for real work.
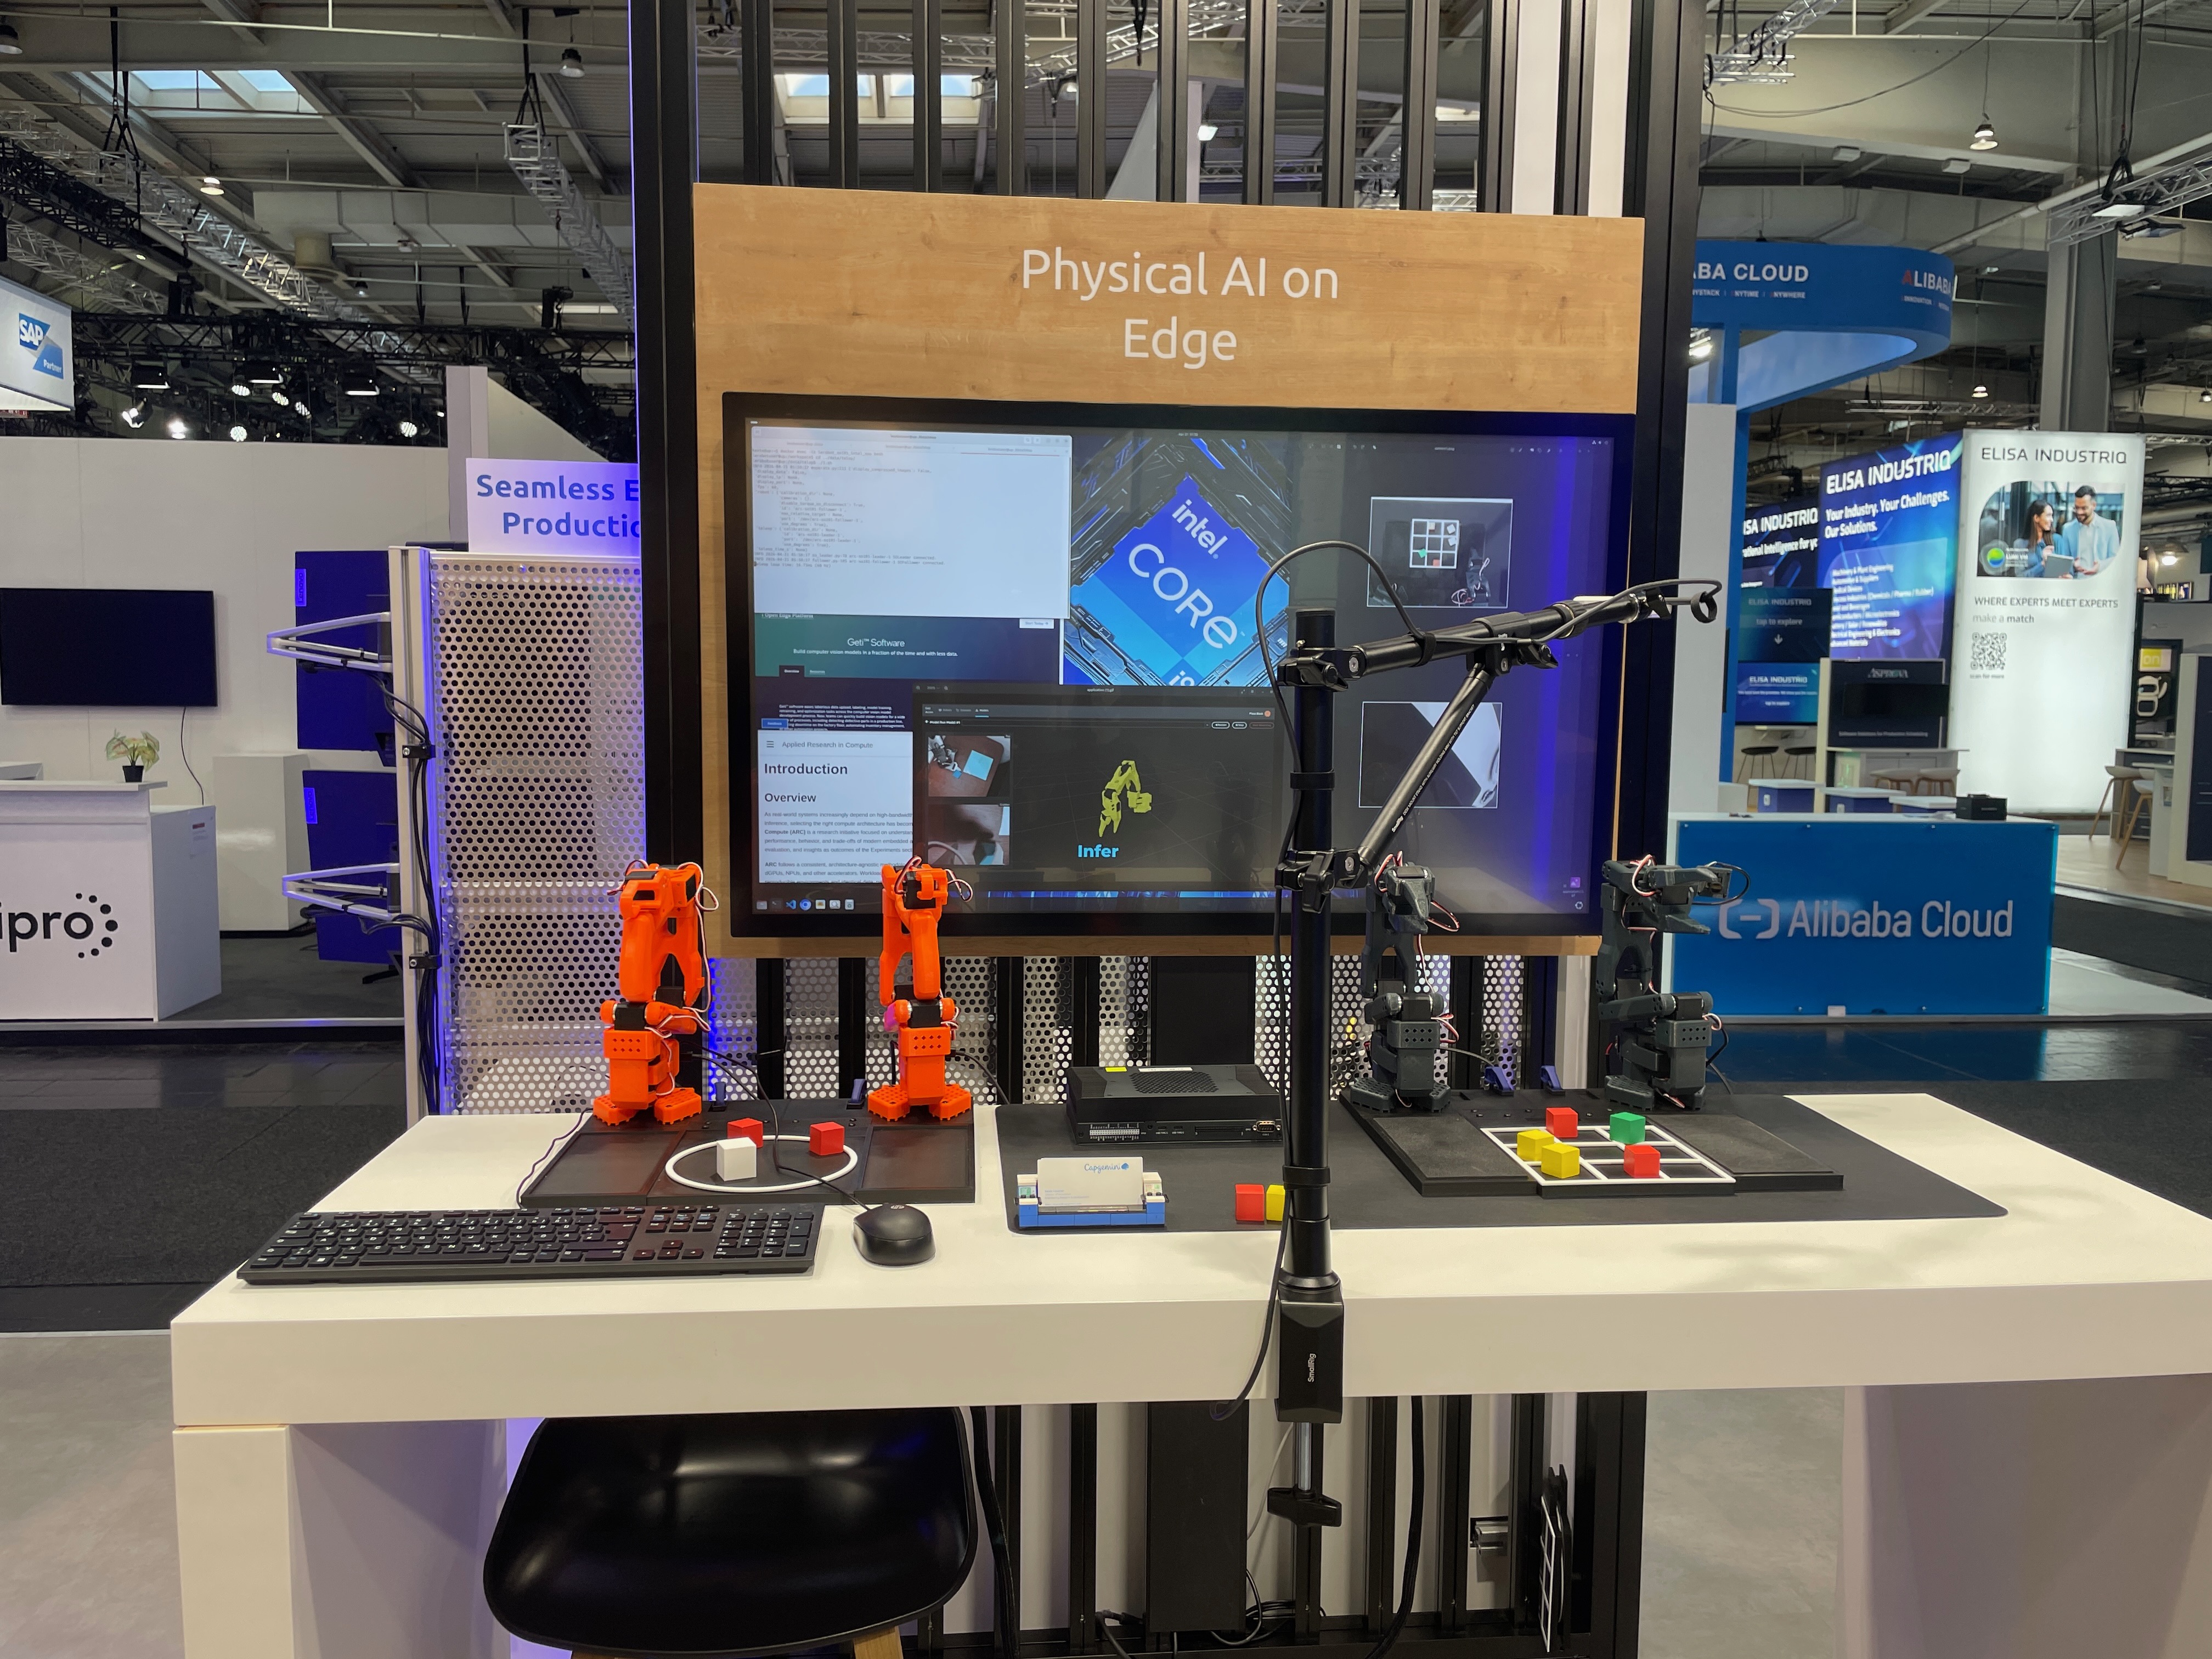
Key advantages of this hardware:
- Multi-accelerator pipeline: CPU + Xe3 GPU + NPU 5.0 enables heterogeneous AI workloads (e.g., multi-camera analytics, object detection, industrial robotics).
- Industrial I/O: GPIO, RS-232/422/485, dual 2.5GbE, and wide-range power make it deployable in factory or automation environments.
- Software readiness: Ships with support for Ubuntu 24.04 LTS, Windows 11 IoT, OpenVINO, and Intel's media/vision stacks for rapid POC-to-deployment transitions.
Component |
Specs |
|---|---|
|
Panther Lake
The UP Xtreme PTL Edge is built around Intel's Core Ultra Series 3 processors (aka Panther Lake). Panther Lake is / was the codename for the Core Ultra Series 3 mobile processors launched at CES in January 2026. I will likely use both names interchangebly, sorry. Unlike its predecessor Arrow Lake, Panther Lake is strictly a mobile-only architecture. Whereas Arrow Lake had a dedicated desktop socket release (LGA1851), Panther Lake is designed specifically for laptops and handhelds but focussing on cutting-edge next-generation integrated GPU, NPU, and all around edge AI system,
Series 3 edge processors are certified for embedded and industrial use cases, including extended temperature ranges, deterministic performance, and 24x7 reliability. This delivers competitive advantages in critical edge AI workloads with up to 1.9x higher large language model (LLM) performance, up to 2.3x better performance per watt per dollar on end-to-end video analytics, and up to 4.5x higher throughput on vision language action (VLA) models. Finally, the integrated AI acceleration enables superior total cost of ownership (TCO) through a single system on chip (SoC) solution versus traditional multi-chip CPU and GPU architectures.
What does this all mean? This machine is a powerful workhorse that is a perfect peice of hardware for robotics, computer vsion, and more.
Process Nodes & Tiles
Before we jump into the guide and describe how to setup this box for robotics, let's quikcly examine the revolutionary nature of this SoC.
Following the disaggregated multi-chip module (MCM) seen in Arrow Lake, Panther Lake is the first SoC to truly take advantage of this technology with three seperate platforms designed for different uses. There is the Panther Lake - U, presented as the entry-level chipset. This is followed by the Panther Lake - H, which is designed to be used with a dedicated graphics card. And finally, Panther Lake - 12xe with a more powerful integrated graphics processing unit that does not require a dedictaed GPU for heavy graphics tasks. The image below showcases these different models along with the node and manufacturer for each.
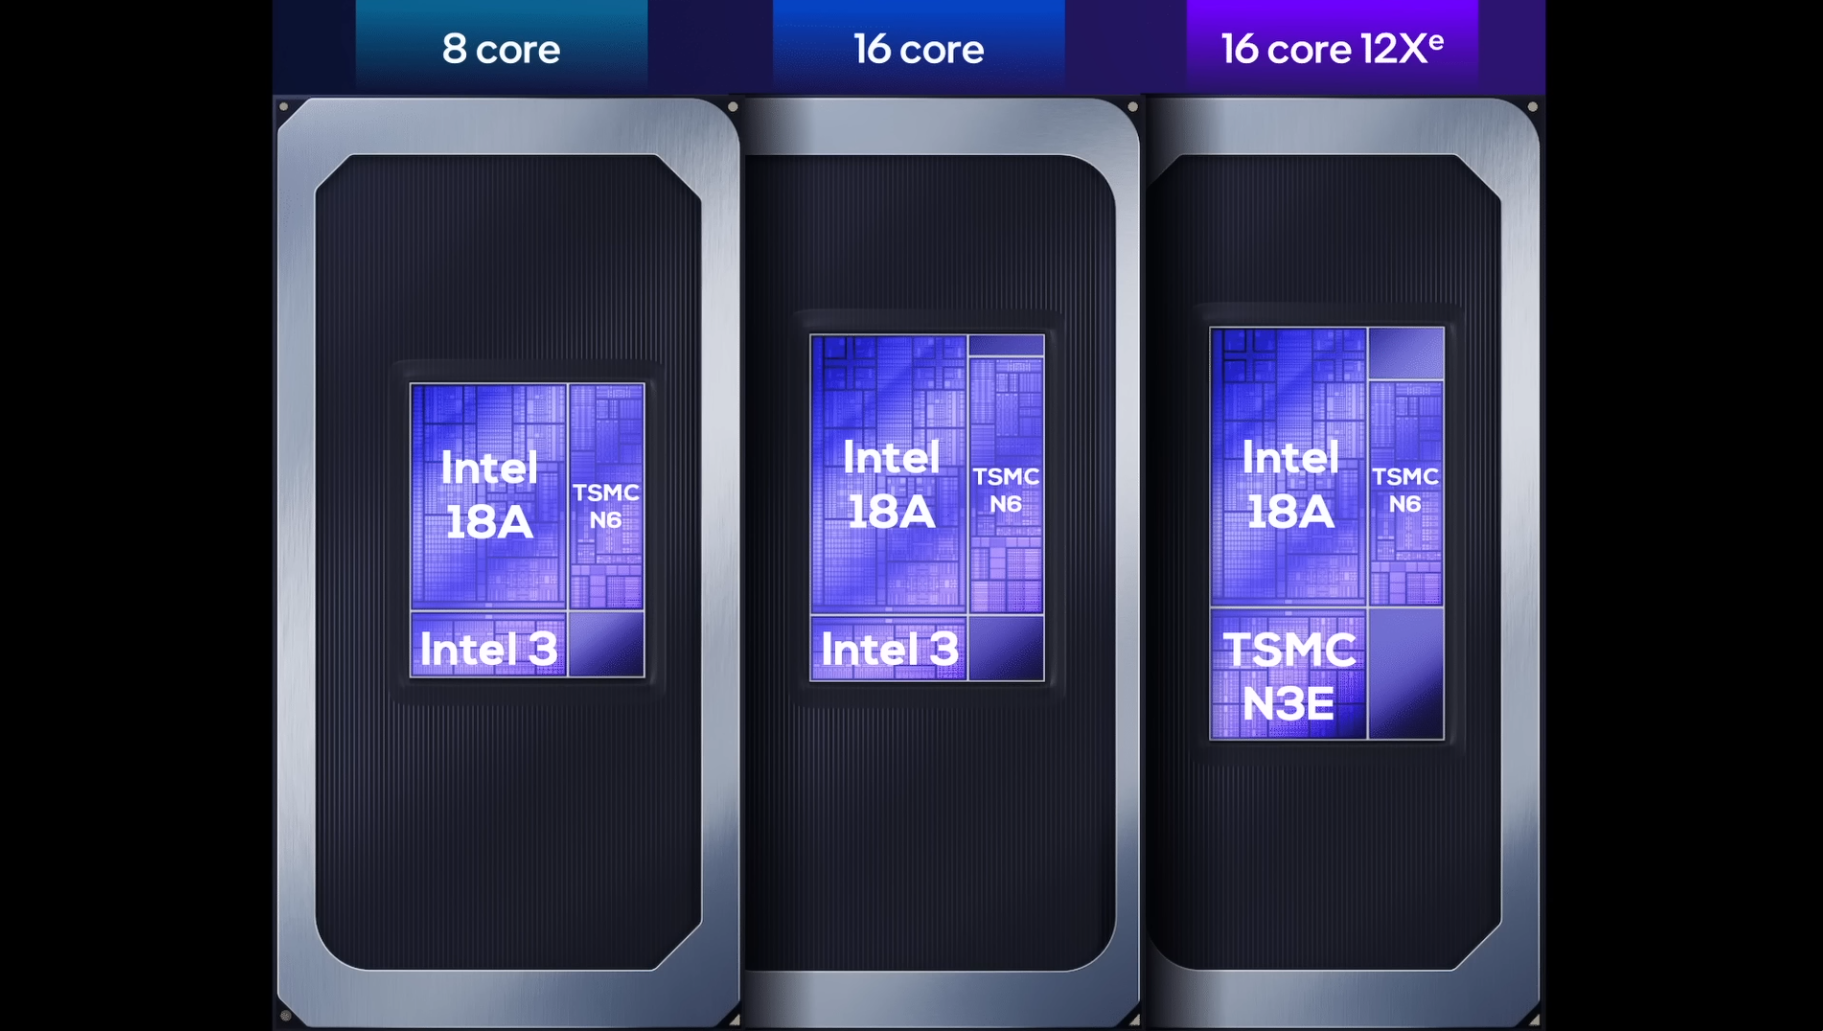
In the above diagram, the Intel 18A nodes are seen in each model. This is Intel's advanced 2-nanometer-class process, and in Panther Lake it is used specifically for the compute tile in all three model variants (H, U, H-12xe). This node introduces the full next-generation transistor stack, RibbonFET gate-all-around transistors and PowerVia backside power delivery, which together improve performance per watt and enable higher density. Panther Lake is the first client SoC family built on this node, fabricated entirely in the United States. Additionally, Intel 18A forms the foundation for at least three upcoming generations of Intel's client and server products.
Core Type |
PNL U |
PNL H | PNL H12xe |
|
|---|---|---|---|
P-Core |
4 |
4 |
4 |
E-Core |
|
8 |
8 |
LP E-Core |
4 |
4 |
4 |
Total Cores |
12 |
16 |
16 12Xe |
The integrated Grpahics Processing Unit tiles are shown above from two different nodes: Intel 3 and TSMC N3E. Taking advantage of the MCM architecture, Panther Lake H and Panther Lake H12xe, both utilize the Intel 3 node for GPU. This makes sense on the U variant which is designed as the entry-level chipset, and it also is fitting for the H variant that is expected to offload signifincant GPU workloads to a dedicated graphic processing unit. The final variant, Xe12, utilizes TSMCs N3SE to handle powerful graphics workloads directly on the SoC.
The platform controller tile aggregates system-level functions such as I/O, memory controllers, power management, security engines, and peripheral interfaces. It acts as the SoC's coordination layer, handling device enumeration, low-power states, and communication between tiles while remaining on a mature, cost-efficient process node. This can be seen as the TSMC N6 node in each of the three variants.
Not shown is the interposer tile, it provides the high-density wiring fabric that electrically connects all other tiles into a unified SoC. It carries die-to-die interconnects, power-delivery networks, and clock distribution, enabling heterogeneous tiles, often built on different process nodes, to operate as a single coherent platform. This utilzies Intel 16 for each model.
The Guide
Ok, with a bit of "toady's lesson" out of the way, we are finally ready to jump in with this machine. Below are the steps required to configure this box for robotics, computer vision, and basically anything you want to throw at it. The goal is to build a foundational environment that can be used for any experiement you can dream up
Important:
This work relies on pre-release drivers, experimental repositories, or interim firmware, and therefore these instructions age quickly. Once the component support migrates into standard distribution pipelines, some steps described here may become unnecessary or even counterproductive. Always check when a guide was written, understand the purpose of each step, and confirm whether the same changes are still required for your environment.
Real-time Determinism
Real-time determinism means the system can guarantee that certain operations complete within a known, bounded time window, even under load. It's about controlling worst-case latency, not maximizing throughput. For an embedded PC running control loops, sensor pipelines, or time-sensitive robotics workloads, this matters because jitter in scheduling or power management directly affects stability and correctness. Ensuring deterministic behavior keeps the platform predictable enough for control software to rely on timing assumptions, which we need.
If your UPV-EDGE-PTL12XE is brand new, it likely won't have an operating system and will boot directly to a system prompt. One can access the BIOS by rebooting and continually pressing either F7 or DEL until the BIOS loads (both keys work on my EVT board). With that said, the BIOS is bare bones and as this writing, no changes were required. Therefore, be aware that if you experience non-deterministic behavior at a later stage, you should investigate further configuring the BIOS to improve latency, scheduling, etc.. It's not magic, it's science!
System Configuration
As an engineering test platform, the UPV-EDGE-PTL12XE does not provide full out-of-the-box enablement for its iGPU, NPU, and other hardware acceleration paths. The underlying functionality is present, but exposing it requires manual configuration, driver validation, and runtime setup to align the kernel, firmware, and Intel's emerging compute stacks with the hardware. The following sections document the steps needed to bring the system to a fully functional state under Ubuntu 24.04.
Ubuntu 24.04
Install Ubuntu 24.04 using the standard USB installation workflow: create a bootable USB image, boot the system from it, and follow Canonical's guided installer to complete the setup. No special options or customizations are required at this stage, with the exception of selecting “Install third-party software for graphics and Wi-Fi hardware”. At time of initial evaluation, the graphics drivers were not present in the official image used to create the bootable USB-drive. This results in a blank screen at initial boot (after the installation process asks you to remove the USB drive and hit “enter”).
At the time of initial evaluation, one installation issue existed. You may or may not experience this in future installtions:
- Blank Screen After POST - Note this may seem like the system is hanging, but if you look closely you will likely notice your monitor has not gone into sleep / standby mode. It is still recieving some signal which is keeping it alive. This can be rectified by booting into the recovery kernel and running sudo apt update and upgrade to grab the latest graphics drivers, etc. After doing so, you can reboot into the desktop as normal. The process is listed below:
-
- GRUB: Upon starting the machine, repeatedly click the RIGHT SHIFT key. Once the GRUB menu appears, select Advanced Options for Ubuntu, then the kernel ending in (recovery kernel).
- Network Access: The recovery kernel configuration will appear on a magenta screen. Here you to make changes before booting into the kernel. Use the arrow keys and move down to network, then press enter to “Enable networking”. The next sreen will ensure you are aware this will mount the hard drive, and thus changes made will be persisted to disc. You want this, select yes.
- Boot: Once the network option is turned on, the main recovery kernel screen will once again appear. At the top of the menu, select resume, then move beyond the next screen by hitting enter once again. The machine will now boot into the recovery kernel and your monitor will work.
- Update: Once in the recovery kernel, open a terminal window and simply update, upgrade, and restart normally. This will download the required graphics libraries (and other updates) and allow for the normal boot process to function properly.
If you haven't already done at this stage, be sure that upon intial boot you run the following:
# Update apt
sudo apt update
sudo apt upgrade

#Let's restart!
sudo shutdown -r now
OpenSSH
This is not strictly necessary, but installing the Open-SSH server allows for configuration to be completed remotely. Using SSH is an easy way to cut and paste commands from configuratioon documents that may not be easily accessed on the target machine (such as this documentation).
So, let's install the server first:
# Install openssh server
sudo apt install openssh-server -y
Now, if you so choose, you can SSH into the box to perform the remaining steps.
VIM
Not necessary, but VI / VIM is a very useful text editor. Though a minimal version ships with Ubuntu, it lacks much of the functionality that makse VI/VIM so great. But running the install command the full version will be installed:
sudo apt install vim
Hardware Access Permissions
By default, standard users cannot access the “video” or “render” nodes required for GPU and NPU compute. Add your user to the render and video groups:
# Modify the current user
sudo usermod -aG render,video $USER

# refresh the shell so we can see the changes
exec su - $USER
Running groups now should show both video and render as part of your user groups:
groups
Now to confirm your user has access to GPU device nodes you can check permissions on the render node with the below command. You should see permissions such as crw-rw—-+ 1 root render..., this means the devices belong to the group render and since your user has access to the render group, you have acces:
# Expacted output: crw-rw----+ 1 root render ...
# the device belongs to group render
# your user is in render
ls -l /dev/dri/renderD128
In a typical Linux graphics stack, card0 is the primary Direct Rendering Manager (DRM)) device registered by the kernel. It represents the full display-class GPU interface: the part of the graphics subsystem responsible for modesetting, display outputs, and the resources used by Xorg or Wayland to drive monitors. On most systems, this is the first GPU device the kernel initializes, and it's the anchor for the display pipeline: HDMI/DP outputs, framebuffer consoles, and the graphical session all attach to it. Because of that role, card0 often has additional ACLs and session-based permissions applied by systemd-logind, making it behave differently from render-only nodes.
On EVT hardware, it is normal for card0 to be absent. This simply means the kernel never registered a primary display device which is often a result of the display tile, OpRegion tables, or firmware hooks not being finalized on the EVT, so the driver only exposes a render-capable device (card1) and a render node (renderD128). For our purposes, GPU compute, NPU enablement, Vulkan, OpenCL, Level Zero, those render nodes are exactly what we need, and all user-space stacks will target them without issue.
Last, check the card1 node. You should see crw-rw—-+ 1 root video …. Since your user has access to the video group, you have acces:
# Expacted output: crw-rw----+ 1 root video ...
# the device belongs to group video
# your user is in video
ls -l /dev/dri/card1
Docker
We use Docker for nearly all research environments because it gives us repeatability, isolation, and portability without the overhead of maintaining full system images. A container lets us lock down exact versions of tools, drivers, and dependencies so experiments behave the same on every machine, whether it's a Panther Lake board, an Ambarella SoC, or a workstation in the lab. It also keeps our host systems clean and prevents dependency conflicts that slow down development. Whenever Docker isn't possible—usually due to hardware-bound components, kernel modules, or low-level drivers, we fall back to native installs, but the default is always containers because they make our research faster, safer, and dramatically more reproducible.
So let's start installing Docker by getting the prerequisite packages that allow apt to use a repository over HTTPS:
sudo apt install ca-certificates curl gnupg software-properties-common -y
Add Docker's official GPG key:
sudo install -m 0755 -d /etc/apt/keyrings

curl -fsSL https://download.docker.com/linux/ubuntu/gpg | sudo gpg --dearmor -o /etc/apt/keyrings/docker.gpg

sudo chmod a+r /etc/apt/keyrings/docker.gpg
Add the Docker repository to your APT sources:
echo "deb [arch=$(dpkg --print-architecture) signed-by=/etc/apt/keyrings/docker.gpg] https://download.docker.com/linux/ubuntu \
$(lsb_release -cs) stable" | sudo tee /etc/apt/sources.list.d/docker.list > /dev/null

# Update apt
sudo apt update
Install the Docker Engine, CLI, containerd, and Docker Compose plugin:
sudo apt install docker-ce docker-ce-cli containerd.io docker-buildx-plugin docker-compose-plugin -y
Now let's configure Docker to run without sudo. Since this is a local research environment and everything is containerized, we're not concerned about the security implications here. We simply create the Docker group and add our user to it:
# May already exist, that's ok
sudo groupadd docker

# Add our user
sudo usermod -aG docker $USER

# Avoid logging out by running this for changes to take effect in this session
newgrp docker

# Running groups now should show docker as part of your user groups:
groups
Finally, this command grants local Docker containers permission to connect to the host's X11 server, which is required for GUI tools like RViz to render outside the container. Without it, the host rejects the container's display requests and the application cannot open.
Place this in the hosts' .bashrc file:
# allow running X from Docker through the host
if [[ -n "$DISPLAY" ]] && command -v xhost >/dev/null; then
    xhost +local:docker >/dev/null 2>&1
fi
Configure APT Repositories
Before installing any hardware-enablement libraries, the system needs access to several Intel-maintained and other APT repositories. Ubuntu does not ship these components natively, so this section adds the required external sources, imports their signing keys, and configures APT to prefer the correct versions. No software is installed at this stage; these steps simply prepare the package manager so later installations pull from the right repositories.
Mesa Graphics PPA
Mesa, also called Mesa3D and The Mesa 3D Graphics Library, is an open source implementation of OpenGL, Vulkan, and other graphics API specifications as well as OpenCL. Mesa translates these specifications to vendor-specific graphics hardware drivers. For example, when you run a 3D application, a Vulkan workload, or anything that touches GPU compute on Linux, Mesa is the layer translating those API calls into something the GPU can execute. It isn't a single driver, but a collection of drivers (ANV for Intel Vulkan, Iris for Intel OpenGL, RADV for AMD Vulkan, and so on), plus shared compiler infrastructure like NIR. Because GPU stacks evolve quickly, Mesa updates often deliver new features, performance improvements, and hardware enablement long before they appear in a distribution's default repositories.
Let's add the Mesa package archive:
# Add the mesa PPA
sudo -E add-apt-repository -y ppa:kisak/kisak-mesa

# Update the APT sources lists:
sudo apt update
Kobuk Intel Graphics PPA
Next, the kobuk-team/intel-graphics PPA is a community-maintained Ubuntu repository that provides newer Intel graphics components than what ships with standard Ubuntu. It focuses on Intel's open-source GPU stack (Mesa, Vulkan drivers, media libraries, and related user-space components) packaged in a way that tracks upstream development more closely than Ubuntu's release cadence. It's essentially a “fast-moving Intel graphics enablement PPA,” used by people who need updated Intel GPU support on Ubuntu before those updates land in the official repos. This can include newer Mesa builds, updated Intel Vulkan drivers (ANV), media acceleration libraries, and sometimes early support for next-generation Intel architectures. Let's add it:
# Add the newer graphics components PPA
sudo -E add-apt-repository -y ppa:kobuk-team/intel-graphics

# Update the APT sources lists:
sudo apt update
Edge Control for Industrial (ECI) Repositories
Edge Control for Industrial (ECI) Libraries are Intel's collection of user-space components designed to expose hardware acceleration features on modern industrial and edge-compute platforms. They provide the glue between the operating system and the underlying SoC blocks (iGPU, NPU, media engines, and other accelerators) so applications can access compute, vision, and AI capabilities in a consistent way. ECI is a set of modular libraries that deliver hardware-specific enablement, device discovery, and runtime interfaces tailored for industrial systems where determinism, long-term support, and predictable behavior matter.
Open a terminal prompt and download the ECI APT key to the system keyring:
sudo -E wget -O- https://eci.intel.com/repos/gpg-keys/GPG-PUB-KEY-INTEL-ECI.gpg | sudo tee /usr/share/keyrings/eci-archive-keyring.gpg > /dev/null
ECI provides two types of APT repositories: a Dynamic APT repository and a Static APT repository. The Dynamic APT repository receives periodic updates, especially when a new version of ECI is released. It contains all the past, current, and future packages from ECI. Use Dynamic when you want to keep your system up-to-date with the latest packages from ECI.
On the other hand, the Static APT repository contains only the packages from a specific ECI version. It is unchanging and will not receive updates. One would use the Static APT repository to prevent future changes to the system.
For this effort, Dynamic will work fine, let's add the repositories:
# Add the ECI APT repository (binary packages) for your Ubuntu release
echo "deb [signed-by=/usr/share/keyrings/eci-archive-keyring.gpg] https://eci.intel.com/repos/$(source /etc/os-release && echo $VERSION_CODENAME) isar main" | sudo tee /etc/apt/sources.list.d/eci.list

# Add the matching ECI source package repository to the same list file
echo "deb-src [signed-by=/usr/share/keyrings/eci-archive-keyring.gpg] https://eci.intel.com/repos/$(source /etc/os-release && echo $VERSION_CODENAME) isar main" | sudo tee -a /etc/apt/sources.list.d/eci.list
Now configure the ECI APT repository to have higher priority over other repositories and pin the version of the libflann packages:
sudo bash -c 'echo -e "Package: *\nPin: origin eci.intel.com\nPin-Priority: 1000" > /etc/apt/preferences.d/isar'

sudo bash -c 'echo -e "\nPackage: libflann*\nPin: version 1.19.*\nPin-Priority: -1\n\nPackage: flann*\nPin: version 1.19.*\nPin-Priority: -1" >> /etc/apt/preferences.d/isar'

# Update the APT sources lists:
sudo apt update
oneAPI Repository
Intel's oneAPI is a unified programming and runtime model that gives developers a single, consistent way to use all compute hardware (CPUs, GPUs, NPUs, and other accelerators) without maintaining separate code paths for each device. It provides the toolchains, drivers, and libraries needed for heterogeneous compute, along with standardized interfaces like SYCL and Level Zero that let applications target different accelerators through one abstraction layer.
In practice, oneAPI is the foundation that enables modern Intel platforms to expose their compute capabilities cleanly to user-space, which is why we configure the APT repositories before installing GPU, NPU, or runtime components.
# download the key to system keyring
sudo -E wget -O- https://apt.repos.intel.com/intel-gpg-keys/GPG-PUB-KEY-INTEL-SW-PRODUCTS.PUB | gpg --dearmor | sudo tee /usr/share/keyrings/oneapi-archive-keyring.gpg > /dev/null

# add signed entry to APT sources and configure the APT client to use oneAPI repository:
echo "deb [signed-by=/usr/share/keyrings/oneapi-archive-keyring.gpg] https://apt.repos.intel.com/oneapi all main" | sudo tee /etc/apt/sources.list.d/oneAPI.list

sudo bash -c 'echo -e "Package: intel-oneapi-runtime-*\nPin: version 2025.1.*\nPin-Priority: 1001" > /etc/apt/preferences.d/oneapi'

# Update the APT sources lists:
sudo apt update
OpenVino Repository
OpenVINO is Intel's inference-optimization toolkit that lets you run AI models efficiently on Intel hardware without rewriting them for each accelerator. It provides a unified runtime, model-conversion tools, and performance libraries so frameworks like PyTorch or TensorFlow can execute on CPUs, iGPUs, NPUs, and VPUs, through a single interface. The goal is to make deployment simple and consistent across heterogeneous Intel platforms, giving you optimized inference performance with minimal integration work. Let's add the repos:
# add signed entry to APT sources and configure the APT client to use OpenVINO repository:
sudo bash -c 'echo "deb [signed-by=/usr/share/keyrings/oneapi-archive-keyring.gpg] https://apt.repos.intel.com/openvino/2023 ubuntu22 main" > /etc/apt/sources.list.d/intel-openvino-2023.list'

sudo bash -c 'echo "deb [signed-by=/usr/share/keyrings/oneapi-archive-keyring.gpg] https://apt.repos.intel.com/openvino/2024 ubuntu22 main" > /etc/apt/sources.list.d/intel-openvino-2024.list'

# Update the APT sources lists:
sudo apt updatelists:
sudo apt update
Installations
Mesa Graphics
Now that the Mesa packages were added and sources updated (above), we can install the core Mesa graphics stack. In practical terms, this refreshes the system's GPU-related user-space libraries (EGL, GLX, Gallium, VA-API, VDPAU, and Vulkan). It also installs Xwayland, which allows X11 applications to run under Wayland with the updated driver stack.
# Install the Mesa graphics stack
sudo apt install libegl-mesa0 libgl1-mesa-dri libgbm1 libglx-mesa0 mesa-libgallium mesa-va-drivers mesa-va-drivers mesa-vdpau-drivers mesa-vulkan-drivers xwayland

# ###############################################################
# NOTE: These libraries are constantly updating, the last time I
# ran this I encountered a "broken install" error, which when
# running the "sudo apt --fix-broken install", everything worked
# fine.
#
# If I have time to investiage the reason for this issue, I will,
# but as of April 14, 2026, this was the fix.
#
# ###############################################################
#
# sudo apt --fix-broken install


# Now we can upgrade, once doing this, if you experienced
# display driver issues earlier, they should be gone.
sudo apt upgrade

# Let's reboot.
sudo shutdown -r now
Realtime Kernel
ECI provides Deb packages named customizations-* which add a GRUB menu entry for ECI and prepares the system to be deterministic. Install these packages using the eci-customizations meta-package:
sudo apt install -y eci-customizations
ECI also provides a firmware package which backports updates from upstream to bring better hardware support to the OS distribution. Install this package:
sudo apt-get reinstall '(firmware-linux-nonfree|linux-firmware$)'
Next, install the ECI real-time Linux kernel. There are three options available: Linux Intel LTS PREEMPT_RT, Linux Intel LTS Xenomai Dovetail, and Linux Intel RT Experimental. The latter is a newer kernel than the LTS version that supports the latest silicon ahead of the OS distribution. This kernel is postfixed with -experimental in the package name. Let's install it to ensure we have the latest silicon support:
sudo apt install -y linux-intel-rt-experimental

# Reboot
sudo reboot
When rebooting, you will see a kernel selection screen, do nothing and the experimental kernel will load momentarily. When loaded, open a terminal and verify:
uname -r

# Output should be similar to:
#
# 6.17.11-intel-ese-experimental-lts-r
Additional Linux Firmware
linux-firmware is a large collection of binary firmware blobs that the Linux kernel loads into hardware devices at boot or on demand. This includes functionality such as Intel GPU firmware (GuC, HuC, Xe, media firmware); Intel Wi-Fi firmware (iwlwifi); Intel Bluetooth firmware; and more.
# Install the firmware blobs
sudo apt install linux-firmware

# Reboot
sudo reboot
Once reboot has completed, we can verify that the GuC / HuC modules are enabled with the below:
dmesg | grep -iw "guc\|huc"

# Output should be similar to:
#
# [    9.706146] xe 0000:00:02.0: [drm] GT0: Using GuC firmware from xe/ptl_guc_70.bin version 70.55.3
# [    9.953392] xe 0000:00:02.0: [drm] GT1: Using GuC firmware from xe/ptl_guc_70.bin version 70.55.3
# [    9.957548] xe 0000:00:02.0: [drm] GT1: Using HuC firmware from xe/ptl_huc.bin version 10.3.3
Intel® Level Zero and OpenCL™ Graphics
This command installs the core user-space libraries that allow Intel GPUs to expose OpenCL, Level Zero, and basic graphics capabilities to applications.
sudo apt install libgtk-3-0 libgl1 clinfo libze1 libigdgmm12 libigc1 libigdfcl1 intel-opencl-icd
Examining the output of clinfo should show something similar to:
clinfo | head

# Expected output similar to:
#
# Platform Name               Intel(R) OpenCL HD Graphics
# Platform Vendor             Intel(R) Corporation
# Platform Version            OpenCL 3.0
# Platform Profile            FULL_PROFILE
Now install the Intel® OpenCL™ and Level-Zero GPU offloading sample applications and tracers part of Intel® Profiling Tools Interfaces for GPU (PTI for GPU):
sudo apt install intel-pti-gpu-samples intel-pti-gpu-tracers
Validation
Perform a test using General Matrix Multiplication (GEMM) on GPU device Intel® OpenCL™ kernels:
/opt/intel/pti-gpu/samples/cl_gemm
And profile a General Matrix Multiplication (GEMM) on the GPU device:
cl_hot_kernels /opt/intel/pti-gpu/samples/cl_gemm
Perform a test using General Matrix Multiplication (GEMM) on GPU device Intel® Level-Zero:
/opt/intel/pti-gpu/samples/ze_gemm
Finally, profile a General Matrix Multiplication (GEMM) on GPU device Intel® Level-Zero kernels using tools such as:
ze_hot_kernels /opt/intel/pti-gpu/samples/ze_gemm
Intel® oneAPI DPC++ and OpenMP Compute Runtimes
Install the intel-pti-gpu-samples-oneapi, which is a sample-application package that Intel ships to help developers verify that the oneAPI GPU runtime stack is installed correctly and functioning.
sudo apt install intel-pti-gpu-samples-oneapi
Validation
Perform a test using General Matrix Multiplication (GEMM) on the iGPU device using Intel® oneAPI DPC++ compile runtime:
# be sure to source setvars script:
source /opt/intel/oneapi/setvars.sh

# run the test
/opt/intel/pti-gpu/samples/dpc_gemm
Now run a profile using General Matrix Multiplication (GEMM) on the iGPU device Intel® Level-Zero kernels:
# run the test
ze_hot_kernels /opt/intel/pti-gpu/samples/dpc_gemm
Next, perform a test using General Matrix Multiplication (GEMM) on the iGPU device using Intel® oneAPI OpenMP library runtime:
# run the test
/opt/intel/pti-gpu/samples/omp_gemm
Finally, run a profile using General Matrix Multiplication (GEMM) on GPU device Intel® OpenMP:
OMP_TOOL_LIBRARIES=/usr/lib/x86_64-linux-gnu/libomp_hot_regions.so /opt/intel/pti-gpu/samples/omp_gemm
Intel NPU drivers
Running openVINO inferencing on the NPU device of Intel® Core™ Ultra processors requires the Intel® NPU driver. General information on the Intel® NPU driver can be found on the Linux NPU Driver website (LINK). The driver consists of the following packages:
- intel-driver-compiler-npu: Intel® driver compiler for NPU hardware; the driver compiler enables compilation of openVINO IR models using the Level Zero Graph Extension API.
- intel-fw-npu: Intel® firmware package for NPU hardware.
- intel-level-zero-npu: Intel® Level Zero driver for NPU hardware; this library implements the Level Zero API to interact with the NPU hardware.
Note:
The installation instructions on the Linux NPU Driver website download the .deb files for these components, and install the packages from the downloaded files. Following that pattern, you will not get any upgrades for these packages without manual interaction. For this reason, it is better to use packages from an APT package feed, as is described in the following section.
The packages of the Intel® NPU driver are provided by the APT package feeds configured earlier. The APT package feeds also provides all dependencies of the Intel® NPU driver packages. Install the Intel® NPU driver now:
sudo apt install intel-level-zero-npu intel-driver-compiler-npu
Verify that the /dev/accel/accel0 device exists and that the device belongs to the render group:
ls -lah /dev/accel/accel0
# crw-rw---- 1 root render 261, 0 Jul  1 13:10 /dev/accel/accel0

# Reboot
sudo shutdown -r now
Final Validation
CPU Support
Panther Lake uses hybrid core logic. Now that we have the real-time kernel configured, We can verify that it recognizes the topology and specific CPU features with the below command. The output should correctly identify the Intel Core Ultra (Series 3) processor, for example: Intel(R) Core(TM) Ultra X7 358H.
lscpu | grep -i "Model name"
Next, let's ensure the cpuid tool confirms that it understands the hybrid architecture. The command should output hybrid part: true which means the kernel can access both the P-cores and E-cores:
# Install the tool
sudo apt install cpuid

# Run the query
cpuid -1 | grep -i "hybrid"
GPU Support
As discussed in other Intel architecture sections, for best performance, the Panther Lake integrated graphics device should use the Xe driver rather than the legacy i915 driver. This is verified by running the below:
# You will see "Kernel driver in use: xe":
lspci -k | grep -EA3 'VGA|3D|Display'
NPU Support
The kernel driver for the NPU is intel_vpu. You may be asking yourself “why is this called intel_vpu and not intel_npu?”. The driver is called intel_vpu (often appearing in logs as iVPU or VPU) because it is based on the Versatile Processing Unit (VPU) technology that was initially developed for Meteor Lake processors before being rebranded to NPU. Regardless of the name, it is absolutley critical.
Run the below command, if the module is listed, the kernel has loaded the NPU driver. If nothing is listed, something is wrong or the kernel does not support the NPU.
# Output should be similar to: intel_vpu             290816  0
lsmod | grep intel_vpu
You should also be able to see a device named accel0. This is the direct kernel interface for the NPU. The output of the below command should be accel0.
# Output should be *accel0*
ls /dev/accel/
Finally, a message stating “[drm] Initialized intel_vpu… for 0000:00:0b.0…”, or similar, confirms the hardware was detected and initialized during boot:
sudo dmesg | grep -i "vpu"
If these three tests output the expected results, your phsyical NPU is supported by the currently running kernel.
OpenVino Device Access
Finally, verify that the user-space drivers are correctly recognized by the OpenVINO™ Runtime. We will create a isolated Python virtual environment to install the OpenVINO package and query the available hardware. This available_devices check is the standard method to ensure that the kernel and user-space drivers are communicating properly with the hardware.
# Do this from the home directory
cd ~/

# Install the venv tool
sudo apt install python3-venv

# Create a virtual environment to avoid system-wide dependency conflicts
python3 -m venv openvino_env

# Activate the environment
source openvino_env/bin/activate

# Install the OpenVINO GenAI package
pip install openvino-genai

# Query the OpenVINO Core to list all detected hardware accelerators
# The output should show all three devices: [CPU, GPU, NPU]
python -c "import openvino as ov; print(ov.Core().available_devices)"

# The test is complete, deactivate
deactivate

# Remove the temp test environment
sudo rm -r openvino_env
What's Next?
Getting the Up Xtreme PNL fully configured was a long haul: BIOS quirks, kernel tuning, GPU runtime validation, device provisioning, the whole stack. But now that it's finally dialed in. The moment I saw everything came online for the first time, it was obvious how much headroom it gives us for robotics research. It's the kind of machine you can throw real workloads at: multi-model inference, sensor fusion, motion planning, and the messy, high-frequency loops that make robots feel alive instead of scripted.
I didn't wait long to put it to work. The SO-101 project was the first proving ground, and the PNL handled it without blinking. Two arms running coordinated dexterity routines, imitation learning pipelines feeding new behaviors, and agents playing games that force spatial reasoning: tic-tac-toe, checkers, and the more complex decision trees that come after. The system let us run multiple models side-by-side, each with its own job: perception, policy, refinement, evaluation.
What's exciting is that this isn't the end of the story. Now that the hardware is stable, we can start layering on the things that matter: richer manipulation tasks, multi-agent coordination, real-time adaptation, and the kind of experiments that push beyond canned benchmarks. The PNL gives us a dependable backbone for that work. It's the box that sits quietly in the corner, doing the heavy lifting so the robots can do the interesting stuff.
The hard part is done. Now we get to build. Head on over to the Research section to see how we put this power to use!
Precision Engineering
High-reliability embedded systems, FPGA design, and robotics platforms built with uncompromising attention to detail.
Verified Performance
Benchmarked, stress‑tested, and validated across real‑world robotics and compute workloads.
Robotics & Control
Physical systems, precise motion, and intelligent actuation.